


Multistrand Necklaces Part 1
How to Make Multi-strand Necklaces: Part I
Multistrand necklaces and bracelets are always in style. I can truthfully tell you that I’ve had more trouble with this style of strung jewelry than any other kind. Today, I decided that it was because I hadn’t carefully read the available tutorials online. Therefore, I set out to do just that. Alas, although there are many fine sets of instructions, I couldn’t find anything that answered all my questions. Does that mean I’m asking the wrong questions? I don’t think so. Surely if I have these queries, others do as well. Since I didn’t have time to continue looking for the “Multistrand Stringing for Dummies” book, I decided to figure it out for myself once and for all. Here’s what I discovered.
How long should each strand be?
Some of the directions discussed strands that graduated in length by adding 1 inch to each successive one. For example, if you began with a strand that you wanted to be 16 inches, the next strand would measure 17 inches, the third strand would measure 18 inches and so on. You would, of course, add about another 1 ½ inches to each of these lengths to allow for attaching the connector and/or clasp.
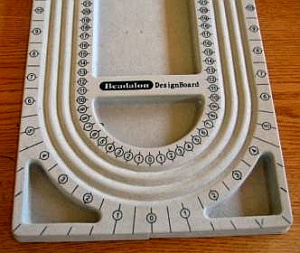
Other online directions appeared to be adding 1 ½ inches to each successive strand, i.e. 16”, 17 ½”, 19”. When I measures the multistrand grooves on my bead design board, each length seemed to be 1 ¼” longer than its inside neighbor.
Hmm . . . There’s not that much difference in any of these measurement, but I really wanted to get it straight. Thus, I laid some bead strands on the bead board to see what happened.
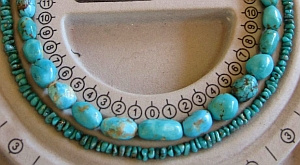
These photos show how the size of the beads can affect our decision about length. The bigger turquoise nuggets in the top picture take up more of the space between the strands. If I wanted more space between the strands, I would need to lengthen that second strand. This may be what accounts for the slight variation in prescribed measures in the tutorials I examined. My current thinking is that I might want only 1” different between strands for small pearls while I might go with 1 ½” or more for larger beads.
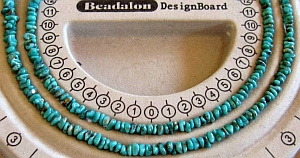
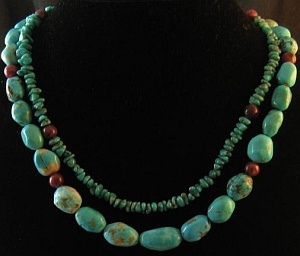
The strands shown in the following picture presented another consideration for length. These are graduated turquoise and I’m certainly glad I considered the size of the largest beads before I strung them. Note that I had to skip one size on the bead design board grooves in order for these two strands to work correctly. That means that the second strand must be 1 ¼” X 2 or 2 ½” longer than the first. If the first strand was 16”, I would need to make the second one 18 ½” inches. Now I have to plan for some spacer beads to make the second strand longer or add spacer beads to both strands and steal a few beads from the short strand to donate to the longer one. The point here is to consider the size of the beads when determining the length of the strands. (Then, you will want to know if you have that much length in your beads.)
The trick is to be consistent. This isn’t too big a deal when you are making just two strands in the necklace, however, consistency IS a big deal when you are stringing more than two. For example, I just finished stringing a four strand sapphire necklace for a customer and I was extremely careful to be sure that each strand was the same amount bigger than the previous one. The beads for that necklace were smaller than pearls and I added only about 7/8” to each succeeding strand. I regret not having taken a picture before that necklace left home. You’ll just have to imagine it.
Note: You may prefer to create a multistrand necklace in which all the strands are basically the same length. This simply means that they will overlap when you wear the piece, but this may be just the look you want. You might enjoy the YouTube video shown at the following link: (http://www.youtube.com/watch?v=jVZKiJbbxvc) showing a necklace in which the strands are basically all the same length..
How do I attach the multiple strands to a clasp or connector?
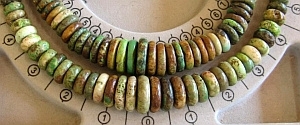
There are several different ways to attach the many strands of your necklace to a clasp or connector. The next photo shows a double strand turquoise and kiwi jasper necklace. The bead design board was very helpful in determining where to put the accent beads.
I used a very simple method for connecting the two strands of this necklace to the clasps. This requires good jump rings that are strong enough to stay closed. As you can see from the picture below, I simply flat crimped each strand to a jump ring. I generally like to have a bead next to the jump ring and set the crimp between the next two beads. This worked fine on the strand ending with the kiwi jasper bead; however, the hole on the small turquoise pieces would not accommodate double wire. That’s why the crimp for this strand is next to the jump ring instead of between two beads. It would look more professional with crimp covers.

I often utilize the above method when working with just a couple of strands; yet, if there are more than two, I prefer to use some other technique. You lose some of the consistency of draping with both this method and the cone method discussed below. One or more of the strands must bend a bit to come in close to the other strand. This causes it to lose a tiny bit of length. You can see how the small turquoise strand is bent in the picture above.
It is common to run the ends of multiple strands through a cone in preparation for adding a clasp to your piece. You’ll find videos showing this technique at the following links: http://www.youtube.com/watch?v=iYLO70jo4zE and http://www.youtube.com/watch?v=yq7K5acn2T8 I used this technique on the next necklace shown here. I randomly strung beads in complimentary colors for these three strands. I did, however, pay attention to the lengths of the strands and graduated them by 1 ½” each in order that I have a 22”, a 23 ½” and a 25” strand. Although the picture shows these strands on the bead design board, I couldn’t use the board to help with measurements since it isn’t that large.

Since these strands were going into a cone, I finished both ends of each with three small seed beads that would fit up inside the cone. I didn’t want wire showing from under the cone.
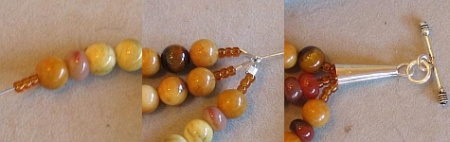
Flat crimp the ends of the strands to an eye pin. Be sure you get the right strand ends attached. This sounds silly, but I’ve actually crimped both ends of the same strand to the same eye pin before. There’s a lot of distraction with this many strands of this many beads. Surely this wouldn’t happen to you, but I just thought I’d mention it.
Finally, snip the eye pin to the proper link, make a plain loop and attach a jump ring and one end of the clasp. Then just repeat this process on the other end of the necklace.

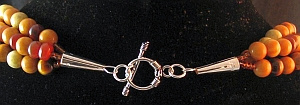
Notice how the strands of this necklace layer one another in the back. You can imagine how crowded this would be if there were more than three strands of beads this size. The three strand ends with seed beads were pretty snug going into the size cone I used. Consider using a larger cone if you plan to have more strands.
If you like the look of these multistrand necklaces, I hope you will try one and see how the suggested measurements and/or clasp applications work for you. It’s actually pretty relaxing to just sit and string all those beads. The closures are a bit more taxing, but just think positively and follow the pictures. You can do it!
This information included only two of the ways to connect a multistrand necklace. Part II will continue this discussion and look specifically at how to apply multistrand connecters as opposed to using jump rings or cones.
Karen Meador
**Contributing authors are noted and linked to in the articles they wrote. All articles are copyright. You can reprint these articles as long as the original author is sited and a link to their site and this website is included. The name Magpie Gemstones must be used as the hypertext.

NEWS!
New beads all the time & great sales!

RESOURCES
Over 100 FREE jewelry making, selling and gemstone tutorials - check it out now!