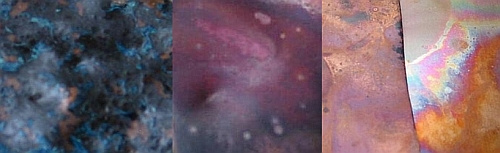
Copper Patina
Copper Patinas: The Search for Color
I’ve been playing with altering the color of copper for a couple of years. Enamored by the beautiful pieces other artists create, I set out to find some answers. I quickly learned that there is a plethora of information regarding this topic both published in books and magazines as well as available online. My problem was that I either couldn’t get the patina to work appropriately in my conditions or the patina recipe required chemicals that I had never heard of, couldn’t locate and didn’t really want to use. I’d like to share with you the things that work consistently for me.
At the outset, I should make it clear that variables will affect the patina achieved. If you want several pieces with exactly the same patina, I highly recommend that you do them all at the same time. For example, if you want all the parts of a handmade chain, including the clasp, to match, you will want to patina them all at the same time. Variables, among many other things, may include the temperature and amount of the liquid used, how much the liquid is diluted, the temperature of the environment, the amount of time the copper is exposed to patination and the condition of the copper. I think you probably have the picture now and can accept this as my disclaimer that you may not get the same results that I have obtained. I can’t even get exactly the same results two times in a row!
The following information from Wikipedia explains the terms used herein. “Patina. . . is a tarnish that forms on the surface of bronze and similar metals (produced by oxidation or other chemical processes); a sheen on wooden furniture produced by age, wear, and polishing; or any such acquired change of a surface through age and exposure. On metal, patina is a coating of various chemical compounds such as oxides or carbonates formed on the surface during exposure to the elements (weathering).. . . ”
These changes can be natural, occurring over time, or we can hurry them along. Most jewelry makers are not content to wait on nature and use some type process on metals. The information presented here refers specifically to copper and I cannot vouch for the effect the processes have on other metals.
Wikipedia also explained that “. . . patina can refer to any fading, darkening or other signs of age, which are felt to be natural or unavoidable (or both).” I guess we could say that the forced patinas created by designers are “unavoidable”! In case you’re a wordsmith, it might be interesting to note that patination refers to the chemical process by which the patina forms and a final work or art is said to be patinated if it has a patina.
I’ve tried many different methods to produce a patinated piece, but am not discussing most of them since they either didn’t work well or I could not replicate them. Also, I’m not including information pertaining to patinas that can be purchased such as black/brown patina, etc. You can find many manufactured patinas and the stores that represent them can provide that information.
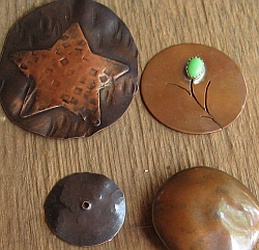
The first patina I ever used was rendered by Liver of Sulfur, a substance with fumes that are stinky, but reasonably harmless. Albeit, you would not want to linger over your Liver of Sulfur and it is best used in a well-ventilated or outside area. Liver of Sulfur is available in several forms including chunks, a pastelike liquid and the newer gel form. I have only used the latter two and prefer the gel. You can find Liver of Sulfur at our other company Stamping Out Loud https://www.stampingoutloud.com/product-category/jewelry-making-supplies-2/color-your-metal-tools/
The photo below shows discs that are indicative of some of the colors you can achieve using Liver of Sulfur. As you can see they range from light to dark. I used steel wool to lighten the patina on the star while leaving the background dark. The color variations are a result of many of the aforementioned variables including temperature of the liquid and duration the metal remains in the liquid. I almost always put my pieces directly in the tumbler for an hour or two after their cold water bath.
Hanging Method
I’ve gotten a pretty nice bluish patina using what I refer to as the “hanging” method. We’ll talk about “bagging” and “burying” later. Below is a disc that I hung.
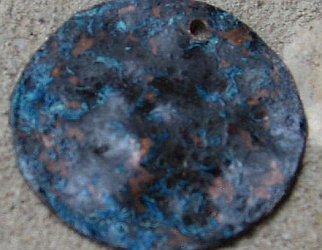
First, I dipped the disc in vinegar and then sprinkled a healthy amount of sea salt on both sides of it. Then I placed about a fourth of a cup of ammonia in the bottom of a coffee can. I strung a wire through the hole in the disc, stretched the wire across the top of the coffee can and put the lid over this. The lid secured the wire and I let the disc hang for four days. The patina that forms is a bit delicate. When I washed this disc, some of the color came off, but enough remained that it was useable. After it dried, I coated both sides with very light spray of glossy polyurethane for a seal. This brought back a good deal of the color that I thought had disappeared during that initial rinse.
Baggy Method
I used a similar procedure on this second example; however I did not hang it.
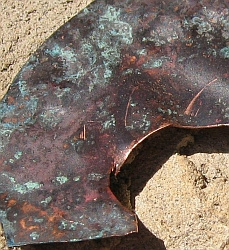
This piece looks deceptively different, but that may simply pertain to the amount of salt used or some other variable. This was a pretty large piece when I started and rather than hanging it, I used the “baggy” method. Again, the copper was dipped in vinegar and sprinkled with sea salt. Then it was sealed in a plastic zip lock bag with a small bowl of ammonia where it remained for four days. Be sure to use a strong bag and don’t puncture it with the metal. If the fumes leave the bag you will have a stinky room and no patina. You could select an appropriate size plastic container with a lid instead of the bag.
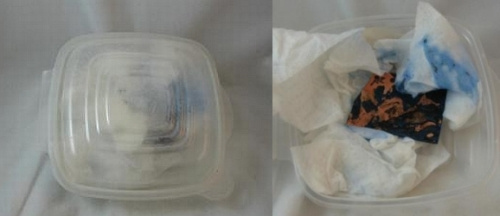
Bury Method
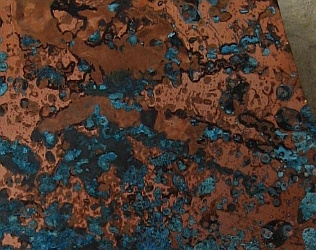
The bury method also utilizes a sealed plastic container. Lay or crumple a few paper towels in the bottom of the container and wet them with ammonia. Sprinkle sea salt on the towels. Then lay the copper piece on top of these and cover it with more towels. I dampen them with ammonia and then lift them off the copper and apply sea salt to the towels. Then I lay the towels back on top of the copper and seal the container. It’s pretty amazing that this works so fast. You can see the blue of the copper through the top of the sealed container below. This is after about 24 hours. I did set it out in the warm summer air which may have hastened the happening. You can see how it looked when I opened the container.
Finally, you can see the copper piece after it has been washed and dried with a paper towel. Don’t worry; it is customary for some of the blue to flake off when you clean the metal.
Fry Method
Now that you have plenty of choices for achieving a blue or blue-green patina, are you ready for something else? I know, let’s fry something. I created the piece below by using my propane torch to heat the copper until it was red hot. Then I immediately quenched it in a glass container of Crisco oil. Be careful because it sometimes sizzles and could get on you. It smells like chicken fried steak! The first time I tried this method, I had the Crisco oil in a plastic bowl. When the hot metal hit the bowl, it made a hole in it and I ended up with oil on the floor. Yes, I know you’re probably smarter than I am about that type things, but I thought I’d warn you anyway!
You can see quite a difference in the two pieces below that were completed with the same method. All I can say is .. . remember those variables? When the metal has cooled you will want to wash it with a degreasing detergent and/or baking soda to remove the oil.
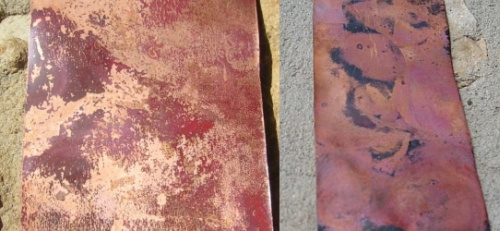
My friend tried this “fry” method with her small butane torch and didn’t have any success. I’ve had good luck with this one and surmise that you need a more powerful torch to get the proper temperature for frying the metal.
Flame Painting Method
There are several videos available that actionize the flame painting method. Basically, you hold the copper with heat proof tongs and move the flame over the metal. When you see the color you like, quickly quench it in water. Then go back and use the flame on another section. You want to go back and forth repeatedly from flame to water. I used a propane torch, but in the helpful video by Lynn Moore, it appeared that she was using a butane torch. ( http://www.youtube.com/watch?v=94E4MaNFILE)
I initially attempted this method by laying the copper on both solderite and then later on a charcoal block. I didn’t have good luck with either of these. It was only when I held the copper in the tongs that the vivid colors appeared.
Some of the available information on flame painting indicates that you cut the shape needed for your design before you flame it. I prefer to flame a nice size piece and then select the spot where I will cut out my design piece. This gives me more control over the color choice for my jewelry.
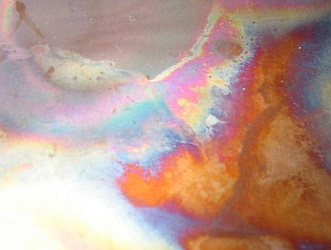
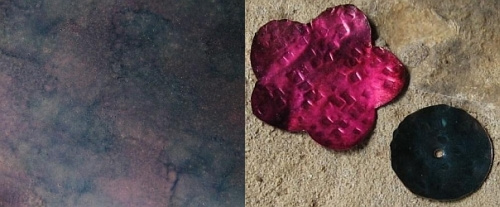
Alcohol Ink Method
Adirondack Alcohol Inks can be used to color copper. In my opinion, this is not really a patina, but I wanted to mention it in this article as a fun way to add color to your metal. You can find a good video tutorial by Tim Holtz at the following address: http://www.youtube.com/watch?v=-KbNWkzZFQg. Mr. Holtz demonstrates the use of the inks on paper, but indicates they are also suitable for metal and I have enjoyed playing with these. The inks come in 28 colors and I have had good luck finding them at the local chain craft store.
The photo below on the left shows a blend of three colors, stream, butterscotch and wild plum. The photo on the right shows a flower in wild plum and a disk done in stream. I regret it is difficult to see the color on the disc. I highly recommend that you seal any copper colored with alcohol inks.
This search for color on copper has been fun. Although it started with considerable frustration at the various things I tried that failed in my environment, I’m pleased that I didn’t give up. It is possible that what didn’t work for me will work for you and vice versa. The trick for me has been to repeat a process enough times that I can replicate any positive effect. The opposite is also true: I’ve tried to repeat a process that didn’t work for me enough times with slight variable modification to be sure it really doesn’t work for me. I hope you will do the same. By the way, there is one particular method I left out – the natural method. There’s nothing wrong with leaving the copper alone and letting nature take its course. If you select this method, please be patient since things happen over time. If you don’t care to be patient, try one of the methods described herein and look forward to being surprised.
Dr. Karen Meador
**Contributing authors are noted in the articles they wrote. All articles are copyright. You can reprint these articles as long as the original author is sited and a link to this website is included. The name Magpie Gemstones must be used as the hypertext.