


Copper Etching
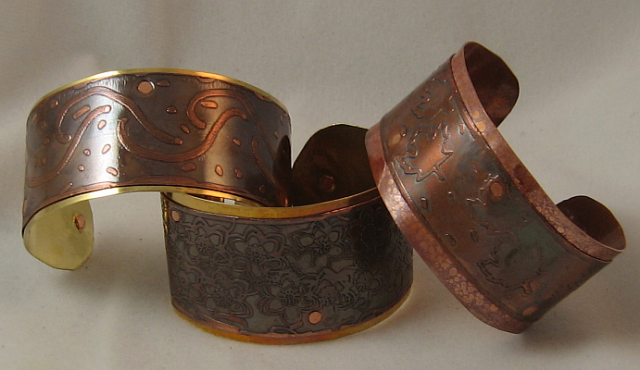
Etching on metal for jewelry design is a somewhat messy process, but it is well worth the trouble. Etching allows the artist to produce original hand drawn designs on the metal or to use premade stamps. The joy of learning to etch comes in viewing the finished product. I am usually surprised by the results, often thinking that nothing has happened until I clean and polish the metal. Below is a photo of three etched bracelets. The design for the one on the far left was hand drawn while the other two were stamped.
Bracelets pictured from Dreamcatcher Designs
Wikipedia describes etching as follows. http://en.wikipedia.org/wiki/Widi/Etching
Etching is the process of using strong acid or mordant to cut into the unprotected parts of a metal surface to create a design in intaglio in the metal . . .
In pure etching, a metal (usually copper, zinc or steel) plate is covered with a waxy ground which is resistant to acid.[1] The artist then scratches off the ground with a pointed etching needle[2] where he wants a line to appear in the finished piece, so exposing the bare metal. . . . The plate is then dipped in a bath of acid, technically called the mordant (French for "biting") or etchant, or has acid washed over it.[4] The acid "bites" into the metal, where it is exposed, leaving behind lines sunk into the plate.
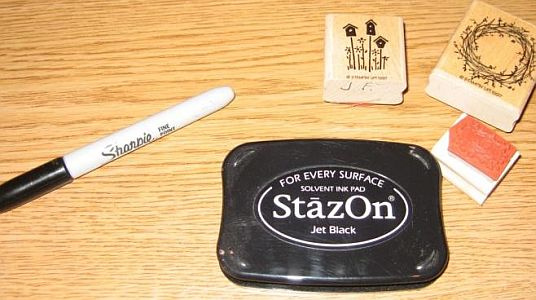
The above description is not exactly the process that most designers use. While we usually do use a strong acid or mordant to cut into the unprotected parts of the metal, we usually cover the design rather than the background with a substance that is resistant to the acid or mordant. This substance is called a “stop out” and in the process that I use it may be either a permanent marker or permanent ink stamp pad. The process described here is for use on copper and I have been told it is the same for brass although I have not tried it for this metal. It is not appropriate for sterling silver.
The prepared metal goes into an etching bath and there are several methods for preparing this. Some designers use ferric chloride which may be a bit difficult to locate. It has been used for etching circuit boards and was formerly stocked by Radio Shack; however at this writing in December 2010, I have not been able to locate it there. The following links provide information about using ferric chloride for etching: http://www.princetonol.com/groups/iad/lessons/middle/Linda-jewelry.htm and
http://www.making-jewelry-now.com/acid-etching-metal-jewelry-part-1.html.
There is also a process known as electroetching and Sherri Haab provides information about this on a Youtube video at http://www.youtube.com/watch?v=9uqpUeNZbMA
The process described herein utilizes an etching bath composed of hydrogen peroxide and muriatic acid often used in conjunction with swimming pools. You can locate the acid at Lowes or other hardware stores or a swimming pool company. The hydrogen peroxide may be purchased at a drug store. You can read more about this type etching from Stephanie Lee at http://stephanielee.typepad.com/stephanie_lee_studios/2008/03/etching-tutoria.html.
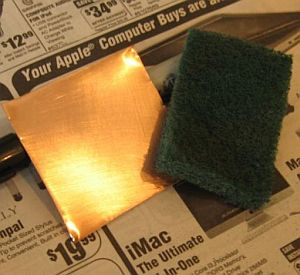
PREPARE: Preparation of the metal prior to etching is essential. Wash it well and then scuff it up a bit with light steel wool or a kitchen scratch pad. You will achieve a better product if you take the time to do this first.
APPLY STOP OUT: Once you have determined your design and prepared the metal, apply the stop out. Either draw the design directly onto the metal with the permanent magic marker or carefully use a stamp and permanent ink to apply the design.
I like to wear plastic gloves during this process as I always manage to ink my fingers.
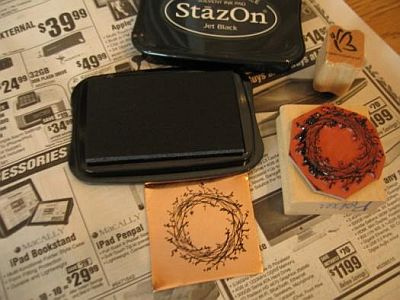
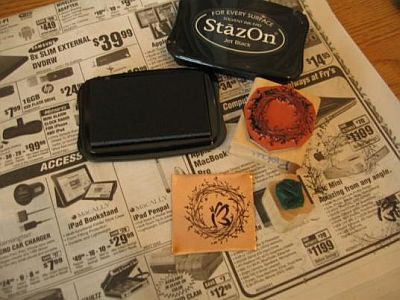
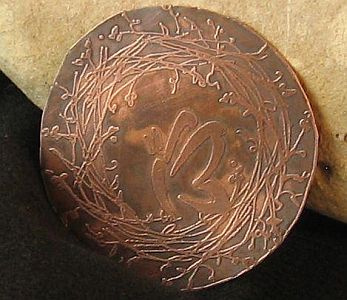
These photos show that I stamped this particular piece twice. First I used a wreath stamp and then I stamped it again using a butterfly stamp. I chose to wait until after I stamped this piece to cut my metal into the final circle shape. This helps if you have a tendency to stamp crooked as I do. I believe most people cut the final shape first and then stamp accurately. This is a matter of skill and choice.

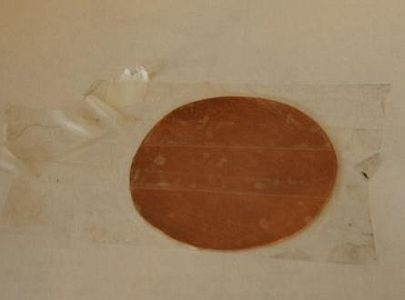
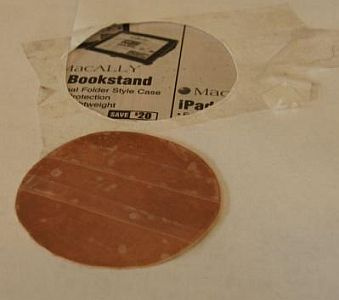
You will want to also apply ink to the back of your piece of metal or the etchant will also eat part of this surface. You may completely cover the back with the magic marker, use your finger to rub ink from the pad onto the back or block it another way. I currently cover the back of the metal with invisible tape. I tape all the way across the metal piece and onto a piece of plain paper. I make sure to press the tape down securely and to overlap each piece. Then I simply cut around the metal shape making neat edges, but leave the tape completely over the back of the piece.
The last step with stop out is to blacken the outside edges with a black permanent magic marker so the etching bath will not eat the sides. I was not able to get a picture of this step, but it is important.
PROTECT: The next step is VITAL for your well being. Go outside or to a very well ventilated area. Cover the surface where you will perform the next step with several layers of newspaper, heavy plastic or a tile as shown in the picture. Cover your hands with plastic gloves and wear protective glasses. You should also cover your body with a protective layer of clothing and wear shoes that protect your feet from spills. Avoid inhaling the fumes while you are etching. Are you getting the idea that the acid used in etching is DANGEROUS? The following information is regarding safety when using this acid is from http://en.wikipedia.org/wiki/Hydrochloric_acid
Concentrated hydrochloric acid (fuming hydrochloric acid) [historically called muriatic acid or spirits of salt] forms acidic mists. Both the mist and the solution have a corrosive effect on human tissue, with the potential to damage respiratory organs, eyes, skin, and intestines. . . . Personal protective equipment such as rubber or PVC gloves, protective eye goggles, and chemical-resistant clothing and shoes are used to minimize risks when handling hydrochloric acid.
MIX: Use a plastic container with a good lid and carefully mix the bath for your metal. You will use two parts hydrogen peroxide and one part muriatic acid. BE SURE to slowly pour the one part muriatic acid into the two parts of hydrogen peroxide being careful not to let it splash.
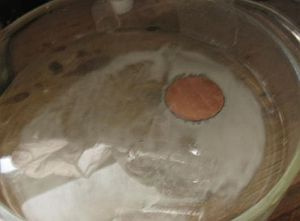
ETCH: Use wide plastic tape to suspend the design piece into the bath. This is a bit tricky but can be accomplished by tearing off a piece of tape that spans more than the plastic container width. Working from the middle, attach the tape to the back of the design piece. You will have enough tape left to attach to the top sides of the container and suspend the design piece into the bath. Wasn’t it nice of my husband to hold the tape while I took the picture!
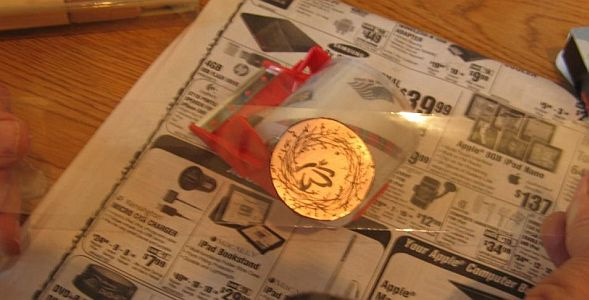
You want the entire piece to go into the bath. Don’t worry if the bath comes over the top of the tape.

The process only takes about fifteen to twenty minutes. Stay with the etching bath the entire time to prevent accidents caused by pets or others. Gently agitate the container during this time. You will see bubbles forming, a sign that the bath is doing its job. When this is complete, I carefully lift the ends of the tape from the sides of the container. Be careful not to splash the liquid or drip it on something. Put the piece in a baking soda bath to neutralize the acid. This is exciting! (You’re right, I don’t get out much.) When the piece goes in the baking soda bath, it foams creating many bubbles. It reminds me of the baking soda and vinegar volcanoes we used to make in elementary school.
After a bit, remove your piece and discard all the tape including the pieces that you placed on the back.
I do not store the etching bath unless I plan to use it again the same day. I’ve not had any luck trying to use it after several days. I carefully pour the etching bath into the baking soda bath a little at a time and watch the bubbles rise. Be sure the baking soda bath is in a container about three times the size of the etching bath container. The bubbles produced at this stage rise way above what one would expect. I always worry that they may overflow the container which would NOT be a good thing. Proper disposal of this liquid is a concern. Since it has been neutralized, it should be alright to pour out of doors; however, some may disagree. If you have some place that takes and disposes of this type product, you might rather take it to that establishment.
CLEAN: The etched metal should be properly cleaned to remove any remaining stop out. Use fingernail polish remover for this step. It may be necessary to also use a scrub brush on the piece while holding it under running water. Thoroughly wash the piece.
PATINA: If you want the piece to be darkened, use your choice of types of patina and follow the directions for it. The piece shown here was given a patina with liquid liver of sulphur and then placed in the tumbler for cleaning and polishing. I then used light steel wool to buff the top of the piece and create lighter areas on the metal.
It will be a pendant for a necklace and I may decide to add a few bead dangles on the bottom of the piece or rivet it to a larger circle of brass.
Once more, I advise you to take care when etching and make sure there are no children, animals or unsuspecting others that can be injured by the acid bath. If you have questions, please let me know.
Happy Etching!
____________________
Dr. Karen Meador
**Contributing authors are noted in the articles they wrote. All articles are copyright. You can reprint these articles as long as the original author is sited and a link to this website is included. The name Magpie Gemstones must be used as the hypertext.
NEWS!
New beads all the time & great sales!

RESOURCES
Over 100 FREE jewelry making, selling and gemstone tutorials - check it out now!