


How to Make Extenders
How to Make a Detachable Jewelry Extension – Beading Basics
If you have even given or received a piece of jewelry that was too small, you can certainly appreciate the need for jewelry extenders. Sometimes the piece fits you, but is the wrong length for the garment with which it will be worn. Therefore, I like to have several different kinds of jewelry extenders in my own jewelry box and make them for friends and customers.
When I searched the internet for sources pertaining to how others make extenders, I mainly found sources describing how to add a chain to one side of a necklace or bracelet when it is first created. These are definitely worthwhile and if you don’t know the size of the wearer, it’s a good idea to have a chain on one side of the completed piece and a lobster clasp or hook on the other. Obviously, this allows the wearer to clasp the piece in place at the proper location on the chain.
While I often use the above method on the original jewelry construction, there are times when a piece doesn’t have this type of finish and therefore I really need a detachable jewelry extension. Also, if you sell your pieces at art shows, boutiques or gift shops, the detachable extenders are good to have available for customers. I find that when a customer is ready to purchase a piece, they don’t usually want to wait for you to restring it. The detachable jewelry extenders can solve this problem.
The following information is quite basic, so please don’t feel insulted if you think the directions are obvious. We are all at different places in our learning.
Ask yourself several questions when gathering components for making your jewelry extenders.
1. What is the metal in the original piece? Is it silver, copper, brass, etc.?
2. How much longer does the piece need to be?
3. How long can the necklace extender be without showing on the side of the neck when worn?
4. What type clasp does the original piece have?
5. How will you attach the clasp to the chain? Will you need jump rings or wire?
Metal
Select the same type of metal for the extender that is found in the original piece of jewelry.
Length
Determine how much longer the jewelry piece needs to be. This added length will be the total length of the extender including the clasp, not just the length of the chain. I generally start with a 2 inch piece of chain and then shorten it if needed.
You will also want to consider whether the extension will add too much length and cause the clasps to show on the side of the neck if being used for a necklace. This can be a problem if the necklace is worn with a garment that doesn’t have a collar. (No one wants things sticking out of the side on their neck!) We have various neck sizes, but I have found that I can’t add more that a total of 3 ½ inches before I create uglies on the side of my neck. If a piece requires a longer extender, it may be a good time to add length by restringing.
Clasp Type
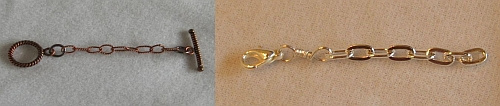
Select the same type clasp as the original piece of jewelry (toggle, lobster clasp, hook). You will attach the selected clasp to the ends of a small length of chain using jump rings or wrapped loops. If you are concerned about your jump rings holding, use two, rather than one, at each end of the chain.
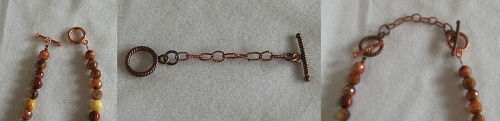
Immediately below are photos showing a necklace with a copper toggle clasp. You can see that the extender I created is of copper chain to which I attached both parts of another toggle clasp using jump rings. Then you can see that I attached this to opposing clasp ends on the necklace.
It’s even easier to make an extension when the original piece of jewelry has a lobster clasp or hook with a chain. Then you need only attach the same type clasp to one end of the chain. This is quite versatile since you can put the lobster or hook in multiple locations on the chain.

Following are a couple of internet links that also discuss necklace extensions. The first shows some extenders made with beads that match the specific jewelry piece. This would be especially nice for that necklace you may have that you like to wear short part of the time and long at other times.
http://www.beadingdaily.com/blogs/daily/archive/2009/10/14/4-ideas-for-necklace-extensions.aspx
http://www.making-beaded-jewelry.com/jewelry-extender.html
I hope this information on jewelry extenders will be useful to you and that you’ll never again need to worry about that jewelry piece that is too short.
Karen Meador
**Contributing authors are noted in the articles they wrote. All articles are copyright. You can reprint these articles as long as the original author is sited and a link to this website is included. The name Magpie Gemstones must be used as the hypertext.

NEWS!
New beads all the time & great sales!

RESOURCES
Over 100 FREE jewelry making, selling and gemstone tutorials - check it out now!