


Torch Enameling
Torch Enameling for Jewelry Design: The Basics
Karen Meador, PhD

Many of you may have previously tried enameling metal pieces with a torch while others are still contemplating this adventure. Let me encourage you to give it a try. It’s one of my favorite techniques and I continue to be excited when small amounts of powdered enamel turn into brilliant colors on metal. There’s more than one way to accomplish this process. I’ve been researching the technique for some time now and believe if I had read all the data I’ve consumed this week, I might never have started to torch enamel. Luckily, that’s not how I started. Following is the short version of my story.
A nice friend at a jewelry-making meetup demonstrated how to use a butane torch and create torch enameled pieces. She used a trivet atop a brick, placed the powdered enamel on a cleaned metal disc and heated this from the bottom. The disc turned the lovely enamel color after only a short time. It looked like good magic to me and I was hooked! Yet, after purchasing my own enamels, I did not enjoy initial success. The enamels I purchased didn’t work and left bumpy ugly colors on my discs. I worked for at least a month trying to “make” it work. I changed variables, including torch type, metal gauge, etc., but to no avail. Later my successful friend let me try again with her enamels. Hurray! It worked. Now I solely use Thompsen Enamels. I would imagine there are other fine enamel products that you can use, but I won’t be experimenting with them further. These powdered enamels usually come in small plastic jars.
Joseph Spencer, a pioneer in the field says that it is “An art expression resembling the work of enamellist Masters of centuries past; incorporating the design of today; while being executed in a process of the future." You can read about the development of his technique . Others also shed light on how they utilize torch enamel and you will find their information at the end of the article.
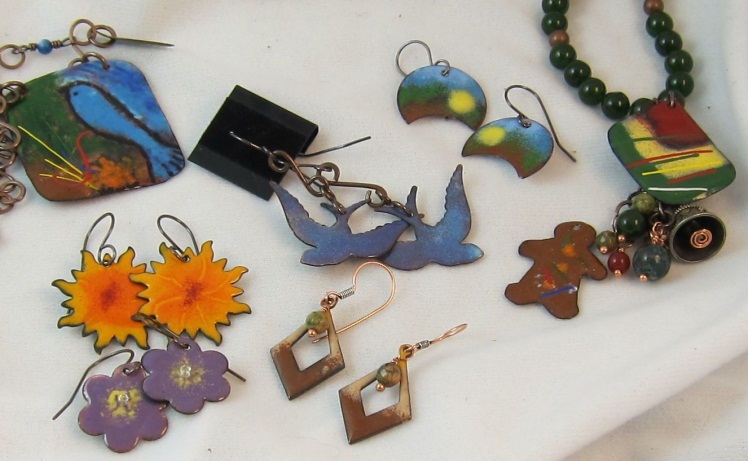
There are many aspects to torch enameling that will not be discussed here. This includes the use of clear coat, liquid fusing 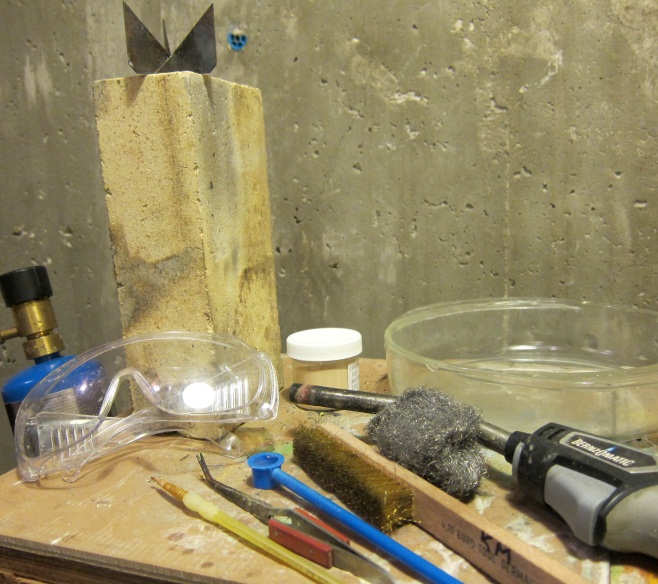 agents, etc. This article is meant to help you get started with the basic technique in hopes that you will investigate the nuances later if torch enameling interests you. These include many interesting elements that you can add to your jewelry design. Some of the discs in the photo at the top display enamel threads and some were done using stencils. These are not discussed herein.
Safety comes first in my studio no matter what the technique and wearing safety glasses is a must for torch enameling. Please protect your eyes since you just never know what might happen with hot stuff or flying enamel. Many articles warn that you may need to wear a mask when enameling. If you are asthmatic or have breathing difficulties, please consider this. I have not found it necessary to wear a mask with the very small size of the pieces I work on, but if I’m at it for more than 30 minutes, I don that mask. I use a box fan to extract fumes out of the work area. I also suggest that you are conscious of what you are sniffing . . . didn’t your Mom teach you that? If you are seated with butane firing too close to your nose, the results may not be good for your health. Just be careful and do what you need to do. I also wear a heavy denim apron and have a dish of water in the work area. You don’t need the water for quench, but might need it for an emergency. I’ve been known to dunk a finger in it when I forgot how hot the disc or trivet remained.
As stated previously there more than one way to torch enamel and I suggest that you find what works best for you, your working conditions and the jewelry design you want to create. One particular technique shown in Barbara Lewis’s book differs significantly from the one herein discussed. You can observe this technique through her tutorial.
I chose a technique that I could use with very little setup and can only tell you what works for me. My hope is that it will work for you or entice you to enroll in a class so you can have fun like I am. This information covers the basics of torch enameling in my studio. The photo above shows the elements of my setup.

There are a good many variables in torch enameling and, as I learned through my experience with enameling, a change in any one of them may effect on the outcome. I’ve already mentioned the type/brand of enamels as a variable. Be advised that you can get both opaque and transparent enamels. Make sure you order what you want.
Torches
Many of the internet references suggest using a torch with MAP gas since it burns clean and hot. Some demonstrate other types such as those torches that burn propane or butane. Deborah Lozier shares her ideas about torches in excerpts from Enameling with Professionals. I’ve not been able to get my tiniest butane torch to melt the enamel, but my larger butane torch, shown below, works fine on small pieces. My preference is my propane torch than has a nice bushy flame. It melts the enamel faster than the butane and I’m usually impatient. For teaching this technique, I use the butane torches. I would recommend that if you already have a torch, you try it first and manipulate the less expensive variables if you have difficulty. (I’m trying to save you money for Starbucks!) Whatever torch you are currently using in your jewelry making may work just fine.
Butane Torch & Propane Torch shown in photos.

Metal
The gauge of the metal is one of those less expensive variables. I mainly use copper and if you are already familiar with heating metal you know that the heavier the metal gauge, the longer it may take to heat it to the temperature you want. You can experiment with how different gauges of metal work with different torches. If you are trying to work with a smaller torch, you may want a lighter gauge metal. Beware, however, of using metal that is such a light weight that it curves while being heated. This happens most often when you are putting several coats of enamel on the piece requiring numerous firings. I use at least a 24g copper sheet metal with my propane torch and 26g with the butane torch. I’ve had good luck enameling copper and have not yet tried the other metals.
Size of Piece
It’s my feeling that torch enameling is for small pieces. The largest piece that I’ve managed successfully was 1 ½ by 1 ¾ inches. I used my propane torch for that one. Plan for this when contemplating the jewelry you are making.
Trivets
All trivets are not created equal. The first trivet that I purchased was not conducive to the way I was using my torch. This trivet, shown below, has a bottom in it which blocked the flame that I directed under the metal piece. I much prefer the second trivet shown that has an open bottom.

The trivet on the left with the bottom in it DID NOT work for me.
I place my trivet atop and at the edge of a fire brick. Some people place the piece on a tripod and mesh screen. This will NOT work if you are counter enameling. When counter enameling, you enamel the back of the piece. If you flip this over to do the top of the piece and lay it on the mesh screen, it will adhere to the screen when heated. Yes, I did this and now have a big hole in my screen where I had to cut off my enamel piece that got stuck.
I’ve been told that some people make a small carrier that can be placed on the tripod without the mesh screen. You can catch a glimpse of this on a Youtube video of Richard Stanley’s class. I regret I don’t have more information about this for you.
Enough with the information, Let’s GO!
What do you need? Gather your safety glasses, torch, sheet metal, enamel, trivet, brick, something heat proof under the brick, cross locking tweezers, enamel sifter, water and patience. Following are the steps I follow for torch enameling a small piece.
1. Cut out the piece (I’m using 24g copper sheet metal)
2. Punch a hole or holes in the piece so that you will have a way to attach it to your jewelry. You must do this prior to enameling. Punching/drilling through the enamel makes it break. This is REALLY important. Look at the disc below. Since I didn’t punch a hole before enameling, I know have no way to hang it on my jewelry. I just made a little mistake!

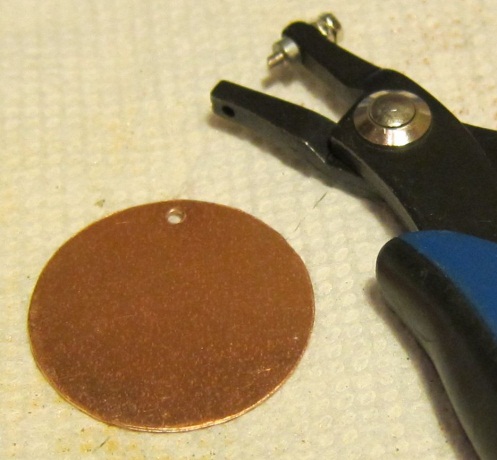
An “unhol(e)y disc”
3. Make the piece a bit “scruffy”. I use a steel brush or scouring pad. Be careful if you use steel wool. I didn’t remove all the little fragments of steel wool on one piece and I have whiskers in my finished enameled piece of jewelry.
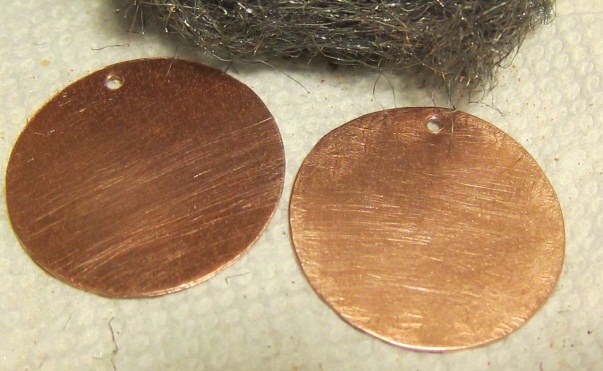
4. Clean the piece to remove any debris or fingerprints. I use regular Dawn dishwashing detergent and water.
5. Put on your safety glasses! Please! (You DO want to be able to read the next step, don’t you?)
6. Counter enamel the piece using whatever color you want. The color will be altered and turn dark when you fire the other side; so don’t lament which color to use. Use the sifter to put powdered enamel on the piece by gently rubbing your finger back and forth on the ridges on the handle of the sifter. Some of the enamel will fall off the piece, so I usually sift holding the piece over the jar of enamel. In lieu thereof, you can lay the piece on the slick page of a magazine which will catch the excess to be poured back into the jar. Place the jewelry piece on the trivet that sits on the fire brick. Apply heat with your torch from underneath the piece. The enamel will begin to melt shortly and you will want to watch for it to form a nice smooth glaze. Shut off the torch and use cross locking tweezers to remove the piece from the trivet. DO NOT drop it in cold water to cool. It will shatter the enamel. I just lay my pieces on the workbench to cool.
7. After cooling, begin the top side of the piece. Check for fire scale that may have occurred when you counter enameled. If there is any, if should flake right off. I often put the piece in warm pickle (used after soldering) and then quench to be sure all the fire scale is gone. Be sure you have all the pickle off the piece before enameling.
8. Follow step 5 for the top of the piece. This color will show in your final product; so select what you want for your jewelry design. I like to use at least two light coats on the top. You may use more than one color on the top of your piece if you would like. When I do this, I usually apply one color, fire and then apply the other. That way I can use a tiny paint brush to remove any powder that splatters onto the first color before firing the second. Note that the earrings below sport a few fluorite gemstones that I got from www.magpiegemstones.com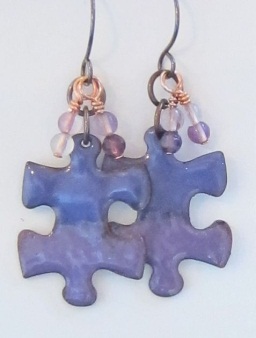
9. Remove the piece and allow it to cool.
There are numerous other things I might tell you about torch enameling, but if you are new to this technique, I think they will muddy the water. Why not get going with these basics and look forward to learning how to use threads, stencils and do sgraffito when you are comfortable with the process?
Resources
http://jewelrybynatsuko.blogspot.com/2009/07/copper-enameling-with-torch-fire.html
http://www.enamelandtiffany.com/Beads/Torch-fired_beads.html
http://mrsbeadsley.blogspot.com/2011/04/torch-fired-enamel.html
http://copperheartdesigns.blogspot.com/2008/05/tutorial-intro-to-enameling.html
_________________________________________________________________
Karen Meador
**Contributing authors are noted in the articles they wrote. All articles are copyright. You can reprint these articles as long as the original author is sited and a link to this website is included. The name Magpie Gemstones must be used as the hypertext.
NEWS!
New beads all the time & great sales!

RESOURCES
Over 100 FREE jewelry making, selling and gemstone tutorials - check it out now!